
- Install SQL Server (Express) and create a new database
- Install two Nuget packages
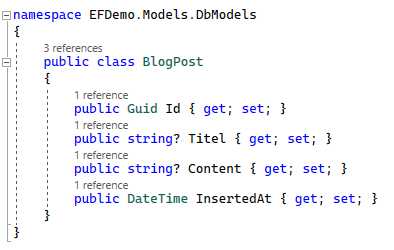
- Create a class whose properties are to be stored in the database.
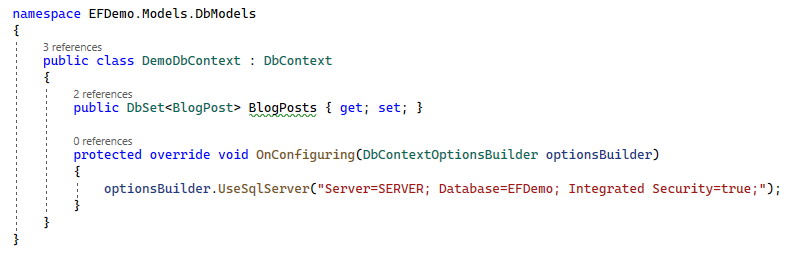
- Create a database context by simply inheriting from DbContext.
- Pass the ConnectionString in OnConfiguring of the DbContext with optionsBuilder.UseSqlServer.
- Add “DbSet<T>” for each of your classes to the DbContext
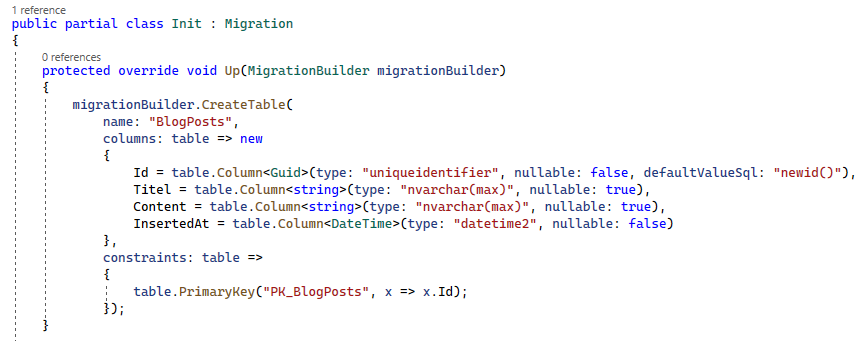
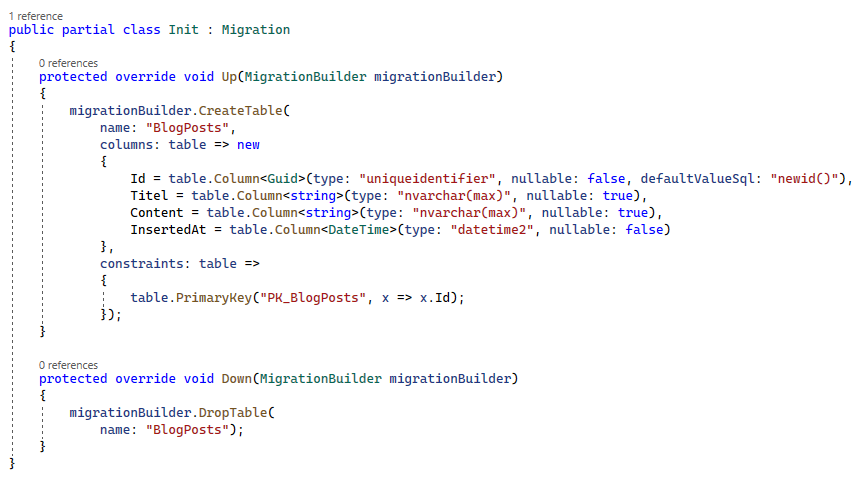
- Open the “Package Manager Console” and type in “Add-Migration Init”. You will get a migration class autogenerated that is named “<Timestamp>_Init.cs” and contain instructions what to change at the database:
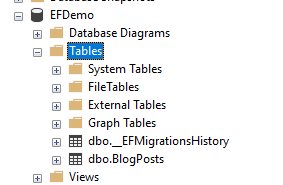
- Also in the Package Manager Console put in “Update-Database”. On hitting the ENTER key the changes will get applied to the database:
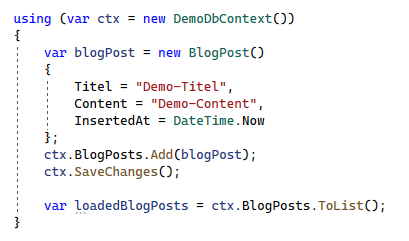
- Save and read data – simply with a “using” and the above created DbContext. DO NOT FORGET to call SaveChanges – otherwise your new entry wont be sent to the database:
- You’re done.
Additional information
EF Core vs EF
But the question – why do I write this again, after there is already so much material on the Internet about it. Because there are many similar documentations and sometimes they work only partially … so I try to roughly summarize the sources here to structure the information a bit:
The Microsoft article from mid 2021 says “EF Core” is the modern database mapper – and the same is actually true for Entity Framework 6 – but with the note that it is no longer under active development:
https://docs.microsoft.com/en-us/ef/efcore-and-ef6/
And also this “What’s new” page from Microsoft indicates that “EFCore 6” is intended for .NET 6:
https://docs.microsoft.com/en-us/ef/core/what-is-new/
This Visual Studio Magazine article describes the transition between versions (EF vs EFCore) quite well:
https://visualstudiomagazine.com/articles/2022/02/22/ef-core-7-preview-1.aspx
Packages + Tooling
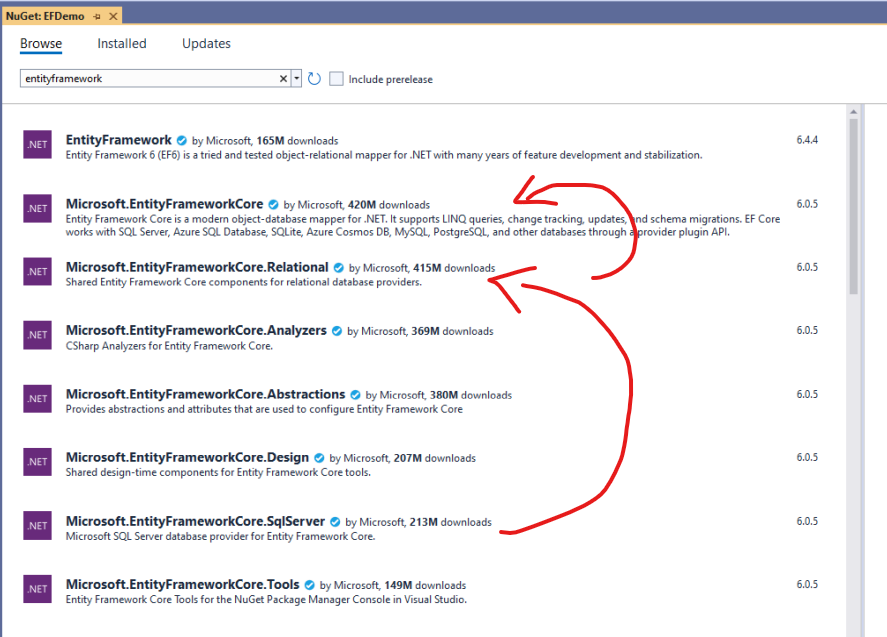
Now that we know we should use the EntityFrameworkCore version, in most tutorials we find the line:
Install-Package Microsoft.EntityFrameworkCore.SqlServer
If we look at the available packages and their dependencies, we will see that Microsoft.EntityFrameworkCore.SqlServer has a dependency on Microsoft.EntityFrameworkCore.Relational, which in turn references Microsoft.EntityFrameworkCore.
In order to get the commands “Add-Migration” and “Update-Database” in the Package Manager Console (among some others) you also need the package “Microsoft.EntityFrameworkCore.Tools“:
https://docs.microsoft.com/en-us/ef/core/get-started/overview/install
Find the connection string
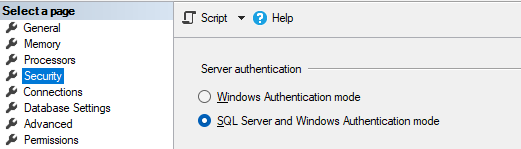
If you don’t know how to create a ConnectionString yet, you can look it up here. For my demo above I used Integrated Security. The connection accesses the database via the Windows user. There’s also an alternative with Username and Password, but you’ll have to make sure that the properties of the SQL Server (right click the main node – properties) are set to “SQL server and Windows Authentication mode” – otherwise only Windows users will work:
https://www.connectionstrings.com/sql-server/
DbSets in the DbContext
To add entities to your DbContext and enable yourself of saving, loading, and deleting those, you simply add a “DbSet<T>” for every entity you want to store. You can configure the behavior like relations or seeding in the OnModelCreating then.
Add auto generated IDs to the model
It is good practice to have database-generated IDs for your entities. You can achieve this by setting the default value of the ID to “newid()” at the database. Unfortunately this requires some custom code in EntityFramework … So I added to my DbContext in the OnModelCreating method a call towards modelBuilder.Entity<T>().Property to configure this specific properties behaviour in the database:

You could actually do the same for all default values – like the InsertedAt in my example to e.g. get the current time inserted into that column automatically.
Add-Migration
When you added your class and your DbContext to your solution and configured the ConnectionString properly, you’ll be able to call “Add-Migration” in your Package Manager Console. The generated class will contain “Up” and “Down” methods. The Up method will be called when you want to apply this change to the database (in this case “Adding a table and configuring it”) – the Down method knows that this table is new and will just drop it.
Update-Database
The last thing you’ll have to do is to call “Update-Database” in the Package Manager Console. This will apply all migrations that have not yet been applied to your database.
You can see here the _EFMigrationsHistory table. This will keep track of which migrations have been applied. So dont delete it and dont delete Migrations files – besides you want to – then delete this table AND all of your migration files, simply add a fresh migration and the new migration will contain all of the classes that were named in the DbContext (quick fix if you have a lot of changes at the start of your project and want to keep the history clean ;-D).
Linq
The strongest part in the whole database mapping are the LINQ (language integrated query) queries. So you can use those so called Lambda expressions on the DbSets itself and EntityFramework will convert it to SQL:
ctx.BlogPosts.Where(bp => bp.Title.Contains("sql"))This will result in a LIKE statement that searches the title of each BlogPost for the string “sql”.
IMPORTANT:
Those Lambdas return something called an “IQueryable“. This statement has NOT yet been executed towards the database. So you can add additional queries. In my example at the top of this article I used ToList() … ToList will IMMEDIATELY execute the SQL query at the database and return the result …
The Key difference here is that all following WHERE statements will just be executed in the memory of your application and NOT leverage the power of the SQL Server.